What Does The Fox Say Lunch

Monday, September 30, 2013


the fox kids lunch
Year 2, Week 6: What Does The Fox Say?  If you haven't heard, the hottest thing going around YouTube right now it is a silly music video called "The Fox" by a duo named Ylvis.  To understand this lunch you have to watch the video.  Then watch it again.  It is the best three minutes you will spend all day.  Don't take it too seriously, it is meant to be a parody and to be stupid and funny.  So before you go any further, watch the video below if you haven't already.
So my kids are addicted to this video and song.  They want to watch it over and over.  If you have kids, show them the video, they will love it.  Who knew an elephant says "toot?"  Inspired by the video, and my kids obsession with it, I present my daughter's lunch for today!  This was made in a Planetbox Rover and also includes a note from Lunchbox Love.
The fox easy kids lunch
Ingredients:
--2 orange sweet peppers (yes my daughter loves these, they are not just for decoration)
--1 slice of white cheese
--black and red food coloring
--1 serving of broccoli
--1 handful of green and red grapes
--1 handful of black olives
--1 slice of cheddar cheese
--1 serving of pretzel bites
--Any sort of decorative animal things.  I used food picks but you could use stickers, little toys, or anything else you have.  Make sure they are animals that are in the song though!


Directions:
1.  Cut the top and bottom off two orange sweet peppers.  Cut pointy ears out of the top of each pepper and cut a long rectangular piece out of the bottom.  It sounds difficult but just look at the picture above to guide you.  These will be your foxes.
2.  Cut two pieces of white cheese in  "T" shapes to fit on top of the orange peppers to make the white fur.  Trim the sides into whiskers if desired.  Also cut out two small triangles as ears for each fox.  
3.  Look at the pictures above to draw the facial features with food coloring.  Use food coloring markers or a toothpick and normal food coloring.  Assemble the two foxes and place in the main compartment of your container.  Surround the foxes with broccoli to look like trees in the woods.
4.  Fill a side container with grapes (or another fruit your child loves.)  Do the same for another side container with protein or fruit.  Try and use colors that will complement whatever animal decorations you are using.
5.  Arrange a grain in one more container.  I used pretzel bites because I had them on hand in an open bag.  You might want to choose a whole grain.  Decorate the side containers with your animal stuff.
6.  Carve the letters out of cheddar cheese.  You can pick any of the fox sayings from the song.  If you have little letter food cutters that would make it so much easier.  I just did them freehand with a sharp knife.  
7.  I finished off the lunch by using a note from Lunchbox Love.  The joke about the fish fit perfectly with the theme!

Have fun with this and customize the ingredients to your child's likes.  If all else fails just communicate by "morse" with your kid for what they want in their lunch!  Hey remember to follow me on Facebook, Twitter, and Pinterest!  If you are looking for an easy Halloween meal, check out my recent post for my Ghoulish Graveyard Pasta Dinner!
the fox kids lunch
#lbdbento

Ghoulish Graveyard Pasta Dinner

Thursday, September 26, 2013


Fall Halloween graveyard meal #choosemart
I love holidays, I always have.  Ask any of my family and they will tell you that I am one of the first people trying to drag out decorations and get others in the spirit.  That is why I get so excited when Fall is finally here.  This is when Halloween begins and the holidays just keep on coming after that.  The one constant in every holiday is the food.  Food is what helps to make these holidays great and there are so many fun things you can do with it.  Halloween meals are some of the best and so in preparation for the upcoming "spooktacular" month ahead, I wanted to share this pasta recipe.  It is an easy dinner for kids and great for the whole family!  

I prepared enough food for a whole family.  If you have more or less people please adjust the recipe accordingly.  Remember, having leftovers is never a bad thing!  Leftover pasta and sauce are great in lunchboxes the next day.

Ingredients:
--1 package (16 oz.) Linguine
--2 containers (16 oz.) Basil Pesto sauce
--16 medium whole black olives
--12 mushroom caps
--4 hot dogs (I used turkey dogs because they are a little healthier)
--4 slices of bread
--4 slices cheddar cheese
--1 sheet of nori or dried seaweed (can be found in the Asian food section)
--Black food coloring or black food coloring marker

Directions:
1.  Bring water to boil in large pot and cook pasta according to directions.  They were very easy to follow on the package.  Empty basil pesto sauce into small saucepan and heat on low until desired temperature is reached.  Be sure and stir pasta and sauce regularly.  When pasta is done, drain in colander and set aside.

2.  Heat up hot dogs either on the stovetop or in the microwave.  When they are done cooking, cut hot dogs in half.  You will use each half as a tombstone later on.

3.  Boil mushroom caps in pot of water for 5 minutes.  Boiling them in water will help to retain the white color which is essential in making the ghosts.

4.  Arrange desired amount of pasta on each plate.  How much you put on is completely up to you, but you want to make sure and leave room for all the elements of the dish.  Top the pasta with the pesto sauce.  Use just enough sauce to cover most of the pasta and to create the green grass effect as shown in the picture.  DO NOT MIX SAUCE INTO PASTA.

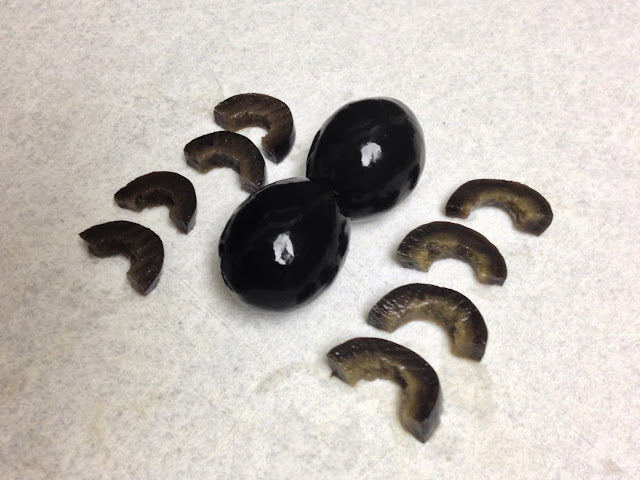
5.  Stick two olives together, end to end, using a toothpick.  These will be the body of the spider.  You will need to do this for each plate of food.  Cut remaining olives into slices and then cut those slices in half.  These will form the legs of the spider.  Place spider body where desired on top of the pasta.  Arrange spider legs on the sides of the body.  You will place four legs on each side.

tarantula

5.  When hot dogs have cooled down a bit, wipe off the moisture with a paper towel.  Write the word, "RIP" on the top of each using black food coloring.  I use two drops each of blue, red, and yellow to create the black color.  Use a toothpick to write on the hot dog with the food coloring.  Alternately you could use a black food coloring marker.  If desired, trace the edge of the tombstone on the hot dog.  Stick the hot dog half into the pasta.  Make sure and push it down enough for it to stay standing.  Surround it with pesto sauce to stabilize if needed.

6.  Cut facial features out of the sheet of nori with scissors.  Use simple shapes because they are easy to cut out.  Three circles for each mushroom ghost will work for their eyes and mouth.  Remember to also cut out the eyes, nose, and mouth for each cheese pumpkin.  Arrange mushrooms on top of pasta and place two eyes and a mouth on each to make the ghost face.

7.  Cut pumpkin shape out of each slice of bread and cheese.  You can use a knife to cut the basic shape, or to make it easier, use any pumpkin shaped cookie cutter.  Cookie cutters work on bread, cheese, and other soft foods!  Put the slice of cheese on top of the bread.  Place the nori eyes, nose, and mouth on the cheese for the face and dab a little bit of pesto sauce on the pumpkin stem to make it green.  

8.  Finish by putting each bread and cheese "pumpkin" next to your pasta on the plate and you have a fun Ghoulish Graveyard Pasta Dinner!

#lbdbento

Product Review and Giveaway: ThrifTee Gear Upcycled Backpack

Wednesday, September 25, 2013

What do you do with all of those old t-shirts you have but don't want to get rid of?  ThrifTee Gear has the answer!  They upcycle your old t-shirts and jerseys and make them into washable, water resistant backpacks and lunch bags.  Sounds great in theory but how do they look and work in reality?  I had the chance to find out when ThrifTee Gear gave me a chance to review their product.

The online process was easy and I was sent a postage paid envelope in which to send my shirt back to them.  I received my new bag back in a about a week.  It looked professional, and the inside liner and pockets were impressive.  The quality and durability also seemed good but before you send off your shirt, you should ask yourself if the size is right for you and your kids lifestyle.  CLICK HERE to learn more in my full in-depth review...

You also have the chance to try one out for FREE.  ThrifTee Gear is giving one lucky Lunchbox Dad reader a free bag!  You can send in your own shirt to be upcycled or choose one of theirs from their website.  Just enter using the Rafflecopter widget below.  This giveaway is offered to US residents only. Please do not enter this giveaway if you have won or received free product from ThrifTee Gear within the past 3 months.

a Rafflecopter giveaway

#parentproductreviews

Oakland Athletics Baseball Lunch

Monday, September 23, 2013

Oakland A's bento baseball lunch
Year 2, Week 5: Oakland A's Division Championship Lunch!  If you don't follow me on Twitter or Instagram, my family and I received an awesome opportunity this past weekend to go to an Oakland A's game.  We are huge fans and my son and daughter loved it.  Dove Men+Care and Major League Baseball gave us the opportunity to go with a few other dad bloggers and their families for their #bigleaguedads campaign.  It was such a fun experience to be out there, meet new people, and spend time with my kids watching our favorite team play.  As it turned out, my kids talked about it all weekend long.  We even listened to the A's win their division on the radio yesterday.  To celebrate the time on Friday, and the championship, I made my daughter an Oakland A's lunch for school.  I tried to use mostly A's colors and also throw in some typical ballpark snacks.  The great thing about this lunch is that you could change it slightly to fit whatever your teams colors are.  Just find some healthy fruit and veggies that fit!  I made this in an Easy Lunch Boxes container.

Ingredients:
--2 slices whole wheat bread cut into circles
(I used a round cookie cutter on all the ingredients of the sandwich)
--1 piece of sandwich meat

--1 slice of white cheese
--2 leaves of spinach
--Green food coloring
--A handful of broccoli (to look like the field, thanks Tara for that idea!)
--A handful of peanuts
--1 serving of pretzel sticks (because I thought they looked like bats)
--1/4 cup honeydew melon cut into small pieces
--1/4 cup mango cut into small pieces


fruit for baseball lunch
Directions:
1.  Place all sandwich ingredients (cut in the shape of a circle) together.  Make sure the cheese in on top.
2.  Use a sharp knife to the the letters out of spinach leaves.  Make the seams of the baseball by using a toothpick and green food coloring.  Put sandwich in your container.
3.  Fill in space around the sandwich with broccoli and peanuts.  Use popcorn if your kids don't like peanuts.
4.  Place pretzel stick bats in first side dish.  Mix up honeydew and mango pieces.  Put these in your second side dish.
5.  Your child now has a fun baseball themed lunch.  Remember you can always substitute some of the ingredients to make your own teams colors.


I hope you have had the chance to make it out to a game with your kids.  Whether it is one that they play in themselves or a pro game it is always fun to get outside and spend time together as a family.  Next time you go, consider making this lunch for them.  It is fairly simple, healthy, and they will love it because you made it!  Remember to follow me on Facebook, Twitter, and Pinterest to keep up to date on all the Lunchbox Dad news and to get even more great ideas for lunches, lunch supplies, and other parenting gear!


Baseball bento lunch
#lbdbento

Product Review: Squeez'Ems Reusable Food Pouches

Thursday, September 19, 2013

Squeez'Ems Reusable Food Pouch Review

We have used disposable food pouches with our kids ever since my daughter was little. They have always been so convenient for a meal on the go. There is basically no mess, and they don’t need to be refrigerated. The problems my family has had with them has been that they are relatively expensive (even on sale) and they create a lot of waste from throwing them out.

When I had the chance to review some of the Booginhead Squeez’Ems Reusable Pouches I was excited. With a 7 year old, 3 year old, and a baby on the way a good reusable pouch would be very valuable for our family. Booginhead sent me out a few pouches to review and so I tested them with a variety of foods.

I first tried them with applesauce. The first thing I noticed was that they were easy to fill. A regular sized spoon will fit all the way into the top of the pouch so you won’t make a mess. I was happy with the amount I was able to put in. Another nice thing about refillable pouches is that you can buy a large jar of food to fill them and it costs much less and produces little waste. My kids sucked the applesauce down fast without many problems.  The only small issue was that because of the design of the lid, there was always a small spoonful of food left at the top that couldn't be sucked out.

The next day I washed them again and filled them with my wife’s healthy fruit smoothies that the whole family loves. We froze those because I wanted to see how the pouches did in the freezer. We took them out the next day and I gave one to my 3-year-old son while also taking one for myself. The pouch worked well once it thawed a bit.  The last test was a bit tougher. We filled them with yogurt and took them to the local amusement park. The kids ate the yogurt for lunch and the pouches spent the rest of the day in a cooler. I was interested to see how they would clean up after that. 

The Squeez’Ems pouches cleaned up fine in the dishwasher after every use, even after a day at the amusement park. The one problem I found was that after a few runs through the dishwasher it was harder to get the lid lined up correctly on the pouch. It still screwed down and didn’t leak but it was a little frustrating to get started. This was true for all the pouches I was given. My suggestion would be to hand wash them to make sure you don’t run into this problem.  Also, over time there is the chance of buildup and I don’t really trust my dishwasher to get it all so I would use a bottlebrush to clean them.

Overall, I like the idea of the Squeez’Ems refillable pouches. Only time will tell if the durability will hold up, but so far the only real issue I have had is with the lids. One thing to keep in mind is that your food will need to be chilled, unlike disposable pouches. The only other suggestion I would make would be to buy a number of them and fill them all at the same time. It can be kind of tedious to fill one or two just for the day. However, if you use them enough they will most likely pay for themselves over time. You can order a two-pack online from booginhead.com for $7.99.

Disclosure: Booginhead sent me this product to review.  I have received no other compensation for this post and the opinions I’m expressing here are solely my own.

#lunchboxreview

Super Mario Brothers Pasta Lunch

Monday, September 16, 2013


#freshfinds #shop
Some people like surprises, some don't.  My son loves them so I decided to surprise him with a fun lunch!  My daughter is usually the one who gets the fun lunches at school but this past Friday was for my son.  While my family was at the supermarket last week I picked up all the supplies I needed to make this lunch "super." My son had just started to watch the old kids show from the 80's called The Super Mario Brothers Super Show, plus he loves pasta, so I decided that this would be the perfect lunch for him.  I made the lunch in a Laptop Lunches lunchbox.

I started with some marinara sauce. My son loved it on top of the corkscrew pasta.  The sauce was very convenient to make. I chose a container that had easy microwave instructions printed on the side. This made it a snap to make!


#freshfinds #shop

Next, I decided to tackle making Mario's face.  I wanted to use whole wheat bread to make it healthier.  I cut a basic face shape out of the slice of bread and used two dabs of fat free cream cheese on for his eyes.  A great secret is to use a toothpick to apply food coloring! It works so well and it only takes a second, that is how I did all the facial features. Remember a few drops go a long way.  To top it off I cut his hair, eyebrows, and mustache out of nori (dried seaweed).  Believe me, I'm no expert I just used some scissors and cut until I thought the pieces looked right.  You can do it too!

His hat looks tricky but as you can see from the picture below it is just a wedge of tomato with a little circle of white cheese.  I used red food coloring to make the "M."  The brim of the hat is a skinny slice of tomato.

For the "star powerups" I used a little cheddar cheese and cut it into two star shapes with some food coloring for the eyes and placed them as accents in the top corners.  I assembled it all, put it on top of a piece of cheese, pasta, and sauce, and I had Super Mario!  My son loved picking the pieces off and eating them all separately.
#freshfinds #shop
I wanted to include some more fruit and veggies, and of course it needed to be Mario Brothers themed.  The green "1-Up mushroom" was easy.  I just wrapped the bottom of the broccoli in white cheese and used a few small circles of the same cheese for spots.  I also used a little food coloring for the eyes and baby carrots for the background.


#freshfinds #shop

The last part of this pasta lunch is the "piranha plant."  All I did was cut a wedge out of the strawberry for the mouth and used cream cheese for the lips and spots.  I made the pipe out of celery and used some natural peanut butter for a little more protein.  This was my son's second favorite part of the lunch.


#freshfinds #shop

If your child loves pasta then they just might love this pasta lunch. I guarantee they will smile when they open their lunchbox to see it!


#freshfinds #shop
#lbdbento

1 Year Blogiversary and Giveaway!!!

Tuesday, September 10, 2013

Today is the 1 Year Blogiversary of lunchboxdad.com!  Its weird to think that it has already been a year of making special lunches for my daughter and sharing them here.  I love hearing the stories of parents who have been inspired to try different things with their kids lunches now and I am so thankful for the friends I have made through this exciting adventure.  Most of all I am thankful for how close this has brought my daughter and I.  That was the main purpose to begin with and it has been really fun to experience.

To celebrate the anniversary I am posting some old pictures of lunches that have been my daughter's favorites (and also some of my favorites as well).  Also I have a giveaway starting today for a FREE fun prize pack and some other prizes including my eBook!  I gave away a ton of products over the last month so I wanted to make this one different.  I made some extra fun ways to enter (make sure you read all of them!) as well.  

So here are our top 10 favorite lunches of the past year (in no particular order), followed by the Rafflecopter entry form for the giveaway!


rapunzel kids lunch
Rapunzel from Tangled
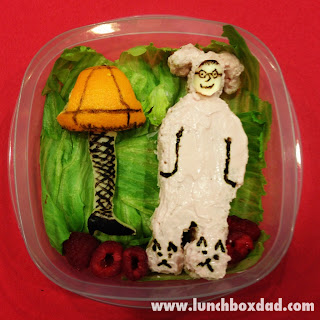
Ralphie and the leg lamp bento
Ralphie and the Leg Lamp From A Christmas Story
Chewbacca kids lunch
Chewbacca from Star Wars
Jack Skellington bento lunch
The Nightmare Before Christmas
Pixar Nemo kids lunch
Finding Nemo
Despicable Me Minions bento lunch
Despicable Me 2 Lunch
Muppets kids lunch
Kermit the Frog from the Muppets, "Its Not Easy Being Green"
lego kids school lunch
Lego School Lunch
Kung Fu Panda kids lunch
Kung Fu Panda
Spiderman Kids Lunch
Spiderman Bento Lunch
a Rafflecopter giveaway

Willy Wonka Lunch for Roald Dahl Day!

Monday, September 9, 2013

Willy Wonka and the Chocolate Factory
Year 2, Week 3: Willy Wonka Lunch for Roald Dahl Day.  This Friday the 13th is Roald Dahl's birthday, so in honor of this I made a lunch based on Willy Wonka and the Chocolate Factory.  I read Charlie and the Chocolate Factory many times when I was a kid and I always wanted to visit the heart of the chocolate factory.  I watched the movie with my kids this past week (the original, not the latest version).  Gene Wilder will always be Willy Wonka to me, no exceptions.  I'll challenge anyone to prove differently.  Besides, the oompa loompas in the new movie are just...creepy!  I was reminded just how magical this story is and what an amazing author Roald Dahl was.  This is a book every kid should read and a movie every parent should watch with their own kids.  My daughter's new dream is to go visit the factory.  So in honor of Roald Dahl Day, here is the lunch for this week, made in an easy lunch boxes container.


You will also want to look at all my friends' Roald Dahl Day bento lunches in this blog hop.  It features lunches from James and The Giant Peach to The Fantastic Mr. Fox and more!  Just click the picture Roald Dahl picture below to get started!
Return to Bento Mischief Home
Willy Wonka food
Ingredients:
--2 slices of whole wheat bread
--1 slice of roast beef
--2 slices of cheddar cheese
--1 slice of any white cheese
--1 red sweet pepper, cut into strips
--3 lettuce leaves
--black food coloring
--1 handful of blueberries
--8-9 roundish grapes
--1 package of fruit snacks
--4-5 toothpicks

Directions:
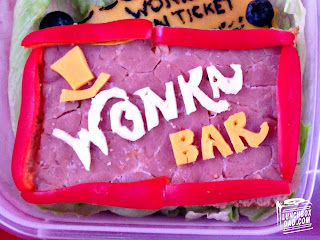
1. Cut both pieces of bread into rectangles.  Cut roast beef the size and shape of the bread pieces.  Arrange strips of sweet pepper around the border.  Attach them with pieces of toothpicks if desired.  Cut pieces of cheese into the shape of Wonka Bar text and logo as shown in picture.  A sharp non-serrated blade knife will help make this a snap!  Place on top of roast beef to look like the Wonka Bar.

2. Cut slice of cheddar cheese to partially fit under the Wonka Bar sandwich.  Trim around the edge in a circular pattern and write "Wonka Golden Ticket" along the top.  Use black food coloring and a toothpick.  If you slide part of the golden ticket underneath the bread, you only need to write a small amount on the cheese.

3. Arrange lettuce leaves in container and place Wonka Bar Sandwich on top with Golden ticket partially underneath.  Sprinkle blueberries around.  I had to bring Violet Beauregard into the lunch didn't I?  A giant blueberry scene is just too good to pass up!

4. Place grapes in a small side dish.  Use grapes that are round and multi-colored.  I arranged them to look like gumballs and my daughter loves them!

5. The Everlasting Gobstopper is a bit trickier.  I used a packet of fruit snacks.  I usually try to use organic but I only had regular this time.  I cut at least one side of each fruit snack so they would stick together easier.  I also attached them together with toothpick pieces to form the "Gobstopper" shape.
willy wonka kids lunch
I hope you have a great Roald Dahl Day.  Take some time this week to week a good book with your kids.  Maybe you could watch a great movie.  Either way spend some time with your kids and have fun, your kids will remember it for a long time--and you will too!  Remember to follow me on Facebook, Twitter, and Pinterest.
#lbdbento

My Little Pony Rainbow Dash Jedi Mashup Lunch

Tuesday, September 3, 2013

my little pony star wars bento kids lunch
Year 2, Week 2: My Little Pony's Rainbow Dash--with a light saber?  My kids and I were riding in the car the other day and we were talking about how funny it would be if My Little Ponies were Jedis.  Its no secret that my kids and I are big Star Wars fans so with apologies to the purists out there, I had to make this lunch.  I knew after that conversation with my kids that there was no way around it.  Sometimes you have to weigh the consequences and decide if you should please your kids or please those who hate Ewoks and Jar Jar Binks.  Ok, bad analogy--everybody hates Jar Jar!  This lunch took a bit longer than I expected but hopefully it will be worth it when she opens it up in the cafeteria today.  This was made in an Easy Lunch Boxes container.  If you want to see some of my other Star Wars or My Little Pony lunches here they are: Chewbacca, General Star Wars, Princess Leia Hamburger, Applejack.


Ingredients:
--2-3 slices whole wheat bread
--1 serving cream cheese tinted with with blue food coloring
--Red, yellow, and orange sweet peppers
--Green pepper, purple potato
--1 serving peanut butter and honey (or whatever sandwich your child enjoys)
--1 handful dried blueberries
--8-10 yogurt covered raisins
--1 hardboiled egg
--1 piece of cheddar cheese
--Black and purple food coloring
--1 pretzel stick and 1 small piece of fruit snack, fruit leather, kiwi, or fruit roll-up


Directions:
1.  Use bread and cut out jedi robe with hoofs, wings, and head as shown.  Cut out second set as well.  Use desired ingredients and press pieces together to make a sandwich.  Spread blue cream cheese on hoofs, wings, head and neck.

2.  Get a potato peeler and cut strips from peppers and potato.  Place strips on head where seen in pic.  Use one dab of white cream cheese for eye.  Draw facial and body details using toothpick and black and purple food coloring.

3.  Wrap very small fruit roll up piece around a pretzel stick.  You could also use a kiwi on a toothpick or a small light saber toy if you wish.  Place in Rainbow dashes hands.  Put all pieces together in main container.  Surround with dried blueberries for background and drop in a few yogurt covered raisins for stars.

4.  Put rest of the sweet peppers in a side dish.  Write words on slice of cheddar cheese as shown with a toothpick and black food coloring.  Place cheese on top of sweet peppers.

5.  Take hard boiled egg and draw Stormtrooper features on the front as shown in picture.  Place egg in other side dish.

This lunch is one the harder ones on my site but it is really unique and a fun one to attempt if your kids love star wars and my little pony.  If this isn't your cup of tea try some of my other Star Wars lunches.  I hope your school year is going well and remember to follow me on Twitter and Facebook in order to see so many more pictures and recipes from my me and other bento making friends.  May the Force Be With You!
#lbdbento

No lunch today, but here's a funny video with animals...

Monday, September 2, 2013

No lunch today because of the Labor Day Holiday.  I will post a lunch tomorrow.  So, here's a video of animals talking like humans...


site design by Design Chicky (© copyright 2015)