Have you seen The Lunchbox Kids video review series on YouTube yet? You really should, we think it's pretty hilarious and it is a brand new feature here at Lunchbox Dad. Watch the video above then check out my entire channel with lunch ideas, reviews, tutorials, and other great stuff! The link is below.
The Lunchbox Kids Review Snack Crackers
Tuesday, November 25, 2014
Have you seen The Lunchbox Kids video review series on YouTube yet? You really should, we think it's pretty hilarious and it is a brand new feature here at Lunchbox Dad. Watch the video above then check out my entire channel with lunch ideas, reviews, tutorials, and other great stuff! The link is below.
Labels:
cracker reviews,
kid reviews,
reviews,
the lunchbox kids,
Wausome Wafers
Monday, November 24, 2014
Disclosure: I was compensated by Skippy for my participation in this promotion. All opinions and the recipe are my own.
Here at Lunchbox Dad I like to show you parenting products and food that will help you out and make your life easier. Normally we talk about lunches and family dinners, but with the holidays right around the corner, I had to share this amazing Sweet and Salty Peanut Butter Cookie recipe we came up with. Actually it's two slightly different recipes but you can make both at the same time. The Reindeer Cookies are a fun variant for kids!
My family heard about Skippy Peanut Butter's #SkippyYIPPEECookies Pinterest contest and we knew we must bake these cookies for inspiration and enter the contest by creating a Pinterest board. It's so easy I wanted to encourage you Lunchbox Dad readers to enter as well. After all, you could win the ultimate kitchen baking kit, one thousand dollars, or a year's supply of peanut butter! All that for just creating a holiday board on Pinterest. To see the rules to enter the contest just click HERE.
My family heard about Skippy Peanut Butter's #SkippyYIPPEECookies Pinterest contest and we knew we must bake these cookies for inspiration and enter the contest by creating a Pinterest board. It's so easy I wanted to encourage you Lunchbox Dad readers to enter as well. After all, you could win the ultimate kitchen baking kit, one thousand dollars, or a year's supply of peanut butter! All that for just creating a holiday board on Pinterest. To see the rules to enter the contest just click HERE.
Some of the best times that my family has is gathering in the kitchen for cooking and baking. It might sound funny, but if you have never cooked a meal with your spouse or baked cookies with your kids then you are missing out. I am challenging you to experiment in the kitchen, try new things, let your kids get silly, and laugh a lot. After all, that's how my family came up with these delicious cookie recipes. We used Skippy because its tastes awesome and they are all about using their peanut butter to help transform every day, ordinary moments into extraordinary fun!
Make no mistake, these are the peanut butter cookie recipes you have been waiting your entire life for, and the recipes are below. They are perfect for the holidays or even just anytime when you need something salty and sweet. For more info about Skippy be sure and check them out on Facebook, Twitter, and Pinterest.
Sweet and Salty Peanut Butter Cookies:
Makes 3 Dozen Cookies
Cookie Ingredients
1 Cup Skippy Creamy Peanut Butter
1 Cup butter (softened)
3/4 Cup granulated sugar
3/4 Cup brown sugar
2 Eggs
1 tsp baking powder
1 tsp baking soda
2 3/4 Cup flour
Topping Ingredients
1 Jar Skippy Natural Dark Chocolate Peanut Butter Spread
2 Cups crushed pretzel pieces
1 Cup granulated sugar
Directions
1. Cream together Skippy Peanut Butter together butter, 3/4 cup granulated sugar, brown sugar, eggs, baking powder, baking soda, and flour. Refrigerate dough for 3-24 hours.
2. Preheat oven to 350 degrees.
3. Form dough into one inch balls. Place remaining granulated sugar in small bowl and roll dough balls in it until lightly covered in sugar.
4. Place dough balls on greased cookie sheet. Lightly press down on middle of balls with a large serving spoon.
5. Bake for 12-14 minutes.
6. Remove cookies from oven and let cool.
7. Spread Skippy Natural Dark Chocolate Peanut Butter Spread on top of cookies. Top with desired amount of crushed pretzel pieces and enjoy!
Rudolph Peanut Butter Cookies
Ingredients
Same as above except do not crush the pretzels into small pieces. Instead you will want large broken pretzel pieces for the reindeer antlers. Make sure and have two for each cookie.
You will also need your favorite candy covered chocolates. Two brown and one red piece for each cookie.
Directions
1. Prepare cookies the same as above in steps 1-5.
2. Remove cookies from oven and immediately insert pretzel antlers into cookies. Let cool.
3. Spread Skippy Natural Dark Chocolate Peanut Butter Spread on top of cookies.
4. Press two brown candies in for the eyes and one red candy for the nose. Serve and enjoy!
#lbdbento
#lbdbento
Thursday, November 20, 2014
On a regular basis our Lunchbox Kids videos will show you the honest truth about what my kids think about all of these products. This includes the good, the bad, and the ugly. Believe me, we've already had some hilarious moments! Our goal is to make these funny, engaging, and helpful.
So please go check out the remodel on our channel and our first two Lunchbox Kids episodes. My children will tell you what they love and what they don't like about Clif Kids ZBars and also Wausome Wafers, a healthier line of snack crackers.
Click the picture above or the link below to check out The Lunchbox Kids and follow our YouTube channel!
Monday, November 17, 2014
Disclosure: This is a sponsored post in conjunction with Hewlett Packard for their new product Sprout by HP. I received compensation for participating in this campaign.

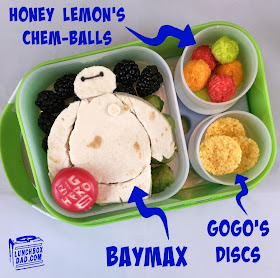
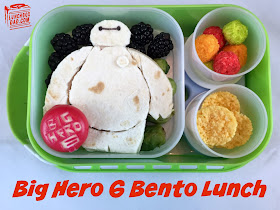
A few days ago I was able to take my kids to see the amazingly awesome Disney movie Big Hero 6. We don't have cable so my kids hadn't seen commercials for it, so they had no idea what they were in for. They absolutely loved it. If you have seen it, you know what I'm talking about. I knew that I had to put together a Big Hero 6 lunch soon. I made this for my daughter and made my son a special Baymax treat also. Baymax is actually a turkey quesadilla! Not in the movie, but in my lunch. That would be weird if he was turkey quesadilla in the movie. I tried to make each container have something from the film. Have you or your kids seen this yet? What is your favorite part? Let me know below!
Honestly, it starts with having fun. You need to want to have a little fun with food and your kids. It doesn't have to be complicated at all. You can begin with just using cookie cutters on sandwiches. It literally takes an extra few seconds. Then you just experiment. See what you have time for and what your kids like. I also try and use food that I already have. It is less wasteful and saves a trip to the store. The next step is owning a good reusable lunchbox. It will save money in the long run and make it easy to plan your lunches. From there, it just takes your imagination.
One other tool that I highly recommend is something that makes it easy to take and keep pictures of what you are doing. Even if you don't want to start a blog, you will want to keep these awesome memories you are creating. For me the Sprout by HP is the best choice for this. You can read my initial reactions to it in my post HERE. My kids and I love looking back at old pictures and your family will as well. The Sprout lets you scan in the lunches (or any creations your family makes), easily edit the photos, save them to your hard drive, and share them online, all in one device. Here was my process yesterday.
I started off by seeing what the different characters looked like and what powers they had (pic 1). Then I scanned in the yubo lunchbox and started sketching out on the Sprout's touch mat what food would go in each container (pic 2). I used those ideas to make the lunch (pic 3). When the lunch was made, I scanned it into the Sprout (pic 4, screenshot unedited). I then edited the photos, saved them, and uploaded them online to my blog...all from one device. The Sprout saves me so much time now that I am able to do everything on one machine.
Hopefully these ideas can help you save time, energy, and make some fun lunches for your kids. You can see more about the Sprout by HP here. Now on to the recipe. Please make sure and follow me on my social media channels for even more lunch and parenting tips!
Ingredients
TortillasTurkey or chicken
White cheese
Babybel cheese
Brussel Sprouts (or other favorite veggies)
Blackberries (or other favorite fruit)
Circle shaped crackers
Grapes
Low Fat cream cheese
Crushed cereal
Black food coloring or food coloring marker
Directions
1. Place your child's favorite fruit and vegetables as the background in the main container. I used brussel sprouts and blackberries.2. Cut out the shape of Baymax from two white tortillas as shown. Put cheese and meat inside. Heat up in microwave and put in refrigerator to cool. Trim off excess cheese and tortilla bits once cold. This is much easier to do after it is cold. Place Baymax on top of fruit and vegetables. Make his eyes using black food coloring or food coloring marker.
3. In a side dish place circle shaped crackers. I used Wausome cheese wafers because my kids love them. I also thought they looked like GoGo's discs that she uses for on her suit.
4. Use a sharp knife to cut the words "Big Hero 6" out of the red wax of Babybel cheese. This is optional but I thought of it at the last minute and thought it was a fun touch. Place it anywhere near Baymax.
5. In the second side dish are Honey Lemon's Chem-Balls. In the movie these are different colors and do many useful things. These were inspired by a recipe I used in this lunch here. I just covered grapes in a small amount of cream cheese. I then rolled them in different colors of crushed cereal.
6. Serve to your kids and watch the smile spread across their faces!
#lbdbento
Labels:
#SproutbyHP,
Baymax,
Big Hero 6,
disney,
Sprout,
Sprout by HP,
yubo
Monday, November 3, 2014
If you missed my Toy Story Jessie lunch from a few weeks ago, my family went with a Toy Story theme for Halloween this year. We had a great time, and I hope you did as well. I wanted to put some closure on this time of year by doing one last Toy Story lunch. I went with a Mr. Potato Head lunch because my wife and I dressed in these costumes. Who knows, maybe a Woody and Buzz lunch will come eventually. Instead of making a bunch of potato head pieces out of food, I thought it would be fun to give the toy a scare and actually serve potatoes a few different ways!
I made this lunch in an Easy Lunch Boxes container. I also did some of the picture taking and editing on my new Sprout by HP device. I am still getting used to the Sprout, but it sure is fun! I hope this can inspire you to do some creative food ideas during the upcoming holiday season.
Ingredients
Whole wheat sprouted breadWhite cheese
Cheddar cheese
Ham
Sweet Pepper
Black yogurt covered raisin
Black edible modeling dough
Brussel sprouts, cooked
Grapes
Baked potatoes
Potato chips
Directions
1. Cut two slices of bread into potato shape. Cut ham and cheese into other potato head pieces as shown. Slice yogurt covered raisin in half for the eyes.2. Mold modeling dough into the shape of a mustache. I was going to use nori but I didn't have any. Either will work.
3. Place bread in main dish and place brussel sprouts as the feet. Surround him with grapes. Arrange other potato head pieces as shown.
4.In one side dish put leftover baked potatoes. I used mini organic ones from a local farm and seasoned them with my daughter's favorite spice. In second side dish put a few potato chips.
5. If you have any other ideas for pieces, feel free to use them instead of the potato side dished I put in. Let me know what you came up with!
#lbdbento


