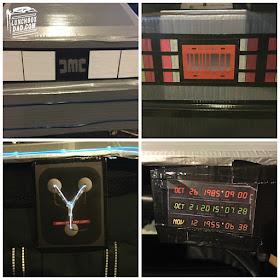
Happy Back to the Future Day everyone! It is October 21st, 2015 today. I have been waiting for this day since I was a kid. It is finally the exact date that Marty McFly, Jennifer, and Doc Brown traveled to the future in the movie Back to the Future II. I thought it would be a great chance to celebrate building a time traveling DeLorean Stroller. I started planning this DeLorean project a few months ago. I saw another dad create one out of a ride on toy a few years ago so I thought, "Why not a stroller?"
Obviously we are huge Back to the Future fans in my family. My wife and I actually decided
to use this in our family Halloween costumes as well. You will have to wait to see those, however. I hope to have video up around that time to show you some of the best features of the project. Until then, scroll down to see inside my DeLorean stroller project and also see
the details that makes this so fun. For the main materials I used PVC pipe, cardboard, our Britax B-Agile stroller, lots of grey and black duct tape, black and grey spray paint, heating vents, battery powered string LED lights, and some old parts off of a broken ride-on toy we had.
I have to say thank you to Britax for sending me their B-Agile 3 stroller to use. It is perfect because it is light and maneuvers easily, which is essential for this project. Also, thanks to my friends at our local bike shop CentriPedal Bikes for giving me the cardboard. I also want to thank my father-in-law Thom for designing and building the PVC pipe frame. He did a fantastic job.
Not only did I build the DeLorean stroller, but I also customized my own hoverboard and Pepsi Perfect bottle. You can't have 2015 without those! I took a stock prop hoverboard and had my own circle Mattel stickers printed. Then I cut out some foam pieces to match the battery pack of the original. For the Pepsi Perfect bottle I took an old water bottle, spray painted it, and added the decal (bought from ebay) and silver line sticker.
I knew I wanted to build the DeLorean out of card board but I also knew that I needed a lightweight frame to put it on. PVC pipe would work well because it is light, but also flexible. I spray painted it black so that you couldn't see any of the pieces once assembled. I also cut and spray painted the cardboard grey. This material was great because it was easy to cut and forgiving on the seams. I used grey duct tape to attach the pieces together.
Here are some more shots of the DeLorean being put together. I pulled the plastic wheels, engine cover, and rear view mirrors from my kids' old broken ride on toy. I reinforced the back end because the weight was going to be too much for the cardboard alone. On a few of the areas, like the bumpers, I just attached duct tape to fill in the gaps. That was much easier than fashioning a whole piece to fit.
I love how the details turned out on the DeLorean. I hand drew the emblem with sharpie marker. I found pictures online of the 2015 license plate, flux capacitor, and time circuits. I printed them out and cut them to fit where needed. I used white battery powered led string lights to really bring the Flux Capacitor to life. They blink like it is actually "fluxing." I chose the 2015 license plate because, while the "outatime" plate from 1985 is iconic, it was only in one scene and the famous flying DeLorean (which this is) only had the orange plate installed. I used yellow, red, and white masking tape to create the tail lights.
Some more shots of the blue battery powered string lights. I can't wait to bring this out at dusk on Halloween. The lights work really well. I bought them off of Amazon for about $7 each.
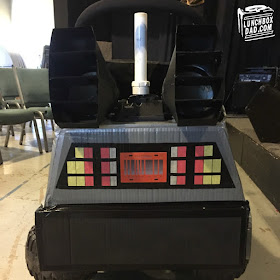
I love how the rear end turned out. I using floor heating ducts and spray painted them black. For Mr. Fusion I bought a plastic pipe and drilled a hole through the plastic engine cover from the ride-on toy. I just inserted the pipe through the hole and it stays because it is a snug fit.
I hope you had fun checking out our project and please make sure and share it with your friends! I will let you know how Halloween goes and if you are in my area and see us, please stop and say hi! We hope to have fun at our church's Pumpkin Patch Party and out on the street trick-or-treating. I am pretty sure you will be able to recognize our family.
#fatherhood


